- Home Page
- Flight Reports
- Sticked Barn Doors
- Multi-Dowel Barn Door
Multi-Dowel Barn Door Kite
First Time Hoisting a Camera!
The Adelaide and Noarlunga weather stations were indicating ideal winds for the big Multi-Dowel Barn Door kite. In kph, the 10-minute average was in the teens while gusting into the 20s.
On arrival at the large grassy school oval, there were thin patchy clouds about and plenty of sunshine. It was around 2:30 pm, so the sun was high and clouds were still forming, marking the tops of thermals.
 MBK Multi-Dowel Barn Door
However, by
the time I got the camera in the air I knew the thermals would be
beginning to fade.
A small clubhouse provided a handy verandah
on which to rig the kite away from the breeze. Next, the garden-hose
reel was installed over a large bolt at the base of a light tower.
Sometimes there is scope for creativity in finding anchor points for
your kite!
It seemed a good idea to first put the kite up on 60
meters (200 feet) of line with nothing hanging—just to see what the air
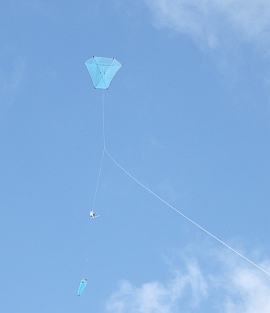
was like up there. This was soon achieved, although the big blue kite
did shudder from time to time in gusts and turbulence.
Whether it was thermal turbulence or just rough air from the suburbia upwind, it was hard to say. Anyway, as the huge barn door lurched about, it recovered itself time after time after time. This instilled confidence that it would do its very best to keep the camera safe, later!
Not game to loft my Pentax Optio G-2 just yet, I walked out to the 30-meter point, running a gloved hand over the line to bring the kite down. My tetrahedral bamboo skewer KAP rig was in readiness, containing the test weight that is just a little heavier than the camera.
Up went the KAP rig as I retraced my steps back to the anchor point. There it is in the photo.
On this site, there's more kite-making info than you can poke a stick at. :-) Want to know the most convenient way of using it all?
The Big MBK E-book Bundle is a collection of downloads—printable PDF files which provide step-by-step instructions for many kites large and small.
That's every kite in every MBK series.
Then it was just a matter of waiting and observing. There were some interesting moments as the rig swung wildly a few times. But overall, everything seemed under control. Good! Still I gave the kite a good 20 minutes up there to really prove itself—or rather, to prove the kite/rig combination.
By the time I decided to attach the camera, it was clear that the wind was becoming milder and hence safer for KAP. Mind you, the camera would be fully enclosed in a bamboo frame, which would have provided good protection from quite a fast descent to the ground. The Optio WG-2 camera also happens to be designed for extreme sports and hence is "everything-proof." Well, the booklet listed quite a few things, including fine dust, water, shock, and extreme cold!
So the moment had arrived. I walked out to the 30-meter point and put a wrap of line around one foot to hold the kite. Meanwhile, I got busy with the fiddly business of removing the test weight, inserting the camera into its sleeve, and doing up a shoelace tie to hold it level. The timer was already active, waiting 5 minutes before it would fire off the first shot.
A jogger detoured suddenly, not wanting to hurdle the line between me and the reel.
Yours truly has been making noises about KAP, via the newsletter mainly, for over a year now! Or is that closer to two years. Aren't you glad there's been some action at last.
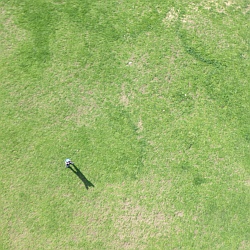
By the time the first shot was triggered, the Multi-Dowel Barn Door kite was heaving around on a 90 meter (300 foot) line. Aren, my 7-year-old boy, was directly underneath, peering up with his hands on his bike helmet. See the photo.
The camera stayed at this height although nearly 30 meters (100 feet) lower than the kite. I was relishing the sight of the $300 Pentax doing what I bought it for, so many months ago. Most of the time, the line of sight to the KAP rig stayed around 40 to 45 degrees from horizontal, putting it roughly 100 feet off the grass.
As expected, wind conditions did calm off, and the kite settled down nicely after a climb to over 300 feet. While on 135 meters (450 feet) of line, a thermal boosted the kite nearly overhead. This put the camera about 350 feet from the ground, which was enough to fit about half the oval into the field of view.
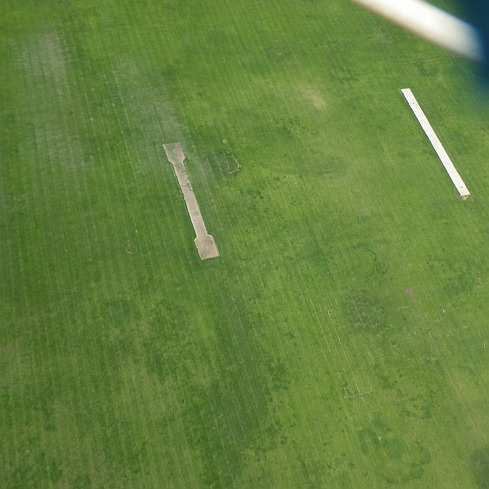
The large photo down the bottom of this page, showing two cricket pitches side by side, was taken around this time. The lawnmower swaths are narrower than in other photos, indicating the extra height. The pale strip in the top right corner of the image is a 4 millimeter bamboo skewer just a few centimeters from the lens.
 Aren looks up
The aforementioned jogger ended up in just one frame of the 60 shots
taken during the kite's KAP flight. The shots were taken at 15-second
intervals, the camera refocusing by itself each time.
Realizing that the timed 20 minutes should have elapsed by now, I brought the line back in to 30 meters once more.
After
much fiddling, including making a short movie focused on the grass (!),
up went the bamboo tetrahedron again. This time some video was taken after I
had carefully focused the camera on some trees at the far edge of the
oval. It was hoped that the distance was about right. The focus is fixed for
the duration of the movie.
Well, it worked, but I think I will be
trying a half-Picavet suspension next time! The drogue hanging off the
back of the rig actually made things worse by jerking the rig into
rotation from time to time. It was enough to make you giddy, watching the
resulting video! Thankfully, there were also periods where the rotation
settled down.
This whole outing was not too disappointing for a
first attempt. Really, it was very satisfying. Many small things have
been noted for next time. For example, inserting the camera into a
sleeve is far too fiddly. A Velcro flap would work better. The
drogue will be ditched and a half-Picavet suspension used, which isn't much more than a
loop of line attached at two points to the flying line.
Most importantly, it will pay to fly the kite over more interesting terrain!
On this occasion the camera saw a lot of grass and not much else. I
also think that in general an angled camera position is going to get
more interesting images. We'll see.
Most pictures were reasonably sharp due to good lighting and the resulting fast shutter speeds.
And
did you think I would forget the customary wind-speed readings? Of
course not. Sitting on a post, the meter recorded an average speed of
7.2 kph with gusts to 22 kph. So, early in the flight, gusts might have
been reaching the high 20s up at several hundred feet—nothing that the
huge Multi-Dowel Barn Door kite can't handle!
 Cricket pitches
The story or stories above document actual flying experiences. My write-ups are definitely "warts and all," since things don't always go totally as planned. However, half the fun of kiting is anticipating the perfect flight. When it happens, it's magic!
As mentioned earlier, there's more kite-making info here than you can poke a stick at. :-)
Want to know the most convenient way of using it all?
The Big MBK E-book Bundle is a collection of downloads—printable PDF files which provide step-by-step instructions for many kites large and small.
That's every kite in every MBK series.
