- Home Page
- Better Kites
- ... Sled Kite
How to Make a Sled Kite
Step by Step—Page 2 of 2
The MBK Dowel Sled
How to Make a Sled Kite
The Towing Points
Here's how to reinforce the towing points:

- Prepare another three lengths of electrical insulation tape, two of them 0.08 DL (9.6 cm, 3 3/4 in.) long, the other 0.05 DL (6 cm, 2 1/2 in.).
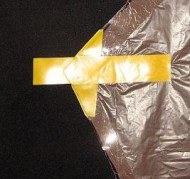
- First, stick down one of the longer pieces of tape from left to right. Let it stick out from the plastic a distance of about twice the tape's width. See the photo.
- Turn the sail over, and stick down the other longer piece of tape exactly the same way so both pieces stick to the plastic at one end and to each other at the other end.
- Lay down the remaining shorter piece of tape across the towing point in a nearly vertical direction then fold the ends under the plastic. The photo shows how the corner of the sail should be covered in tape.
Now go over to the right side of the sail, and do exactly the same thing with another three pieces of tape. The pieces of tape that stick out are where you will attach the bridle line. This method of creating sled towing-points is surprisingly strong and can take a lot of punishment in gusty air.
How to Make a Sled Kite
Bridle
All the construction details for the bridle are contained in the large photo below. Look and read carefully, and you can't go wrong on this rather important bit!
KNOTS
If you are new to this, you might need instructions on how to tie the following knots:

ADJUSTMENT
Once your kite and bridle look like the photo up there:
Fold the kite so it looks like the template diagram back on page 1. The two spars should be touching each other along their entire length. Stretch out the bridle loop across the floor in a straight line. If the Prusik knot is not right at the end, adjust it so it is.
At this point, you've pretty much finished making the Dowel Sled!
How to Make a Sled Kite
Prepare to Fly

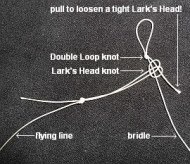
Finally, make up a flying line and attach it to the bridle with a Lark's Head knot.
See the photo, where the Lark's Head has been left loose.
How to Make a Sled Kite
Flying!

First, if it's very windy outside, stay home! This is a big light-wind kite, and it can be a handful in fresh wind.
Assuming there is some breeze outside, just dangle the kite at arm's length until the wind catches it. As long as you feel the kite pulling, let out line slowly by taking loop after loop off the winder.
Be very cautious about letting line slip through your fingers, since this kite can easily give you line-burn!
Another approach is to get a helper to hold the kite up and let it go, on the end of maybe 10 or 20 meters of line. This way, the kite soon gets high enough to make it easy to let more line out.
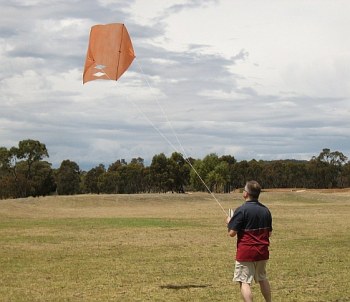
The launch picture with this text shows the sled on its way up in a light and gusty breeze.
Out in the Field
Sled-kite stories of my real-life flying experiences are worth checking out!
Illustrated with photos and videos, of course.
Have fun flying, and I hope you've enjoyed learning how to make a sled kite!
In case you have any difficulties, the e-book instructions for this kite go into more detail about flying issues. There are even some suggested mods that will make this kite less temperamental in rough or gusty conditions.
As mentioned earlier, there's more kite making on this site than you can poke a stick at. :-)
Want to know the most convenient way of using it all?
The Big MBK E-book Bundle is a collection of downloads—printable PDF files which provide step-by-step instructions for many kites large and small.
That's every kite in every MBK series.
