- Home Page
- Kite Plans
- Kite Bridle
The Right Kite Bridle
Legs, Sliding Knots, and More
The right kite bridle can make a lot of difference to how a single-line kite flies. This doesn't apply to single liners with keels, such as most deltas, parafoils, and flowforms. With a few exceptions, these types are designed for a certain wind range and can't be adjusted.
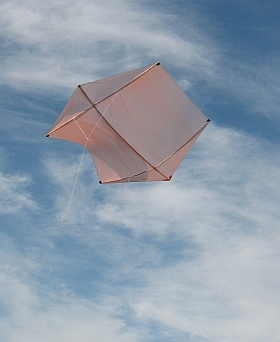 MBK Dowel Rokkaku on its four-leg bridle
This page is devoted to the bridling of flat, bowed, or dihedral kites only. That's about all we flew around here, except for the occasional sled or delta. OK, so there was the Soft Series for a while. And then came the Paper Series, which went back to dihedraled kites again. It was the same again with the Indoor series, which all fly from a single point.
With flying quite a few different types of kites, ranging from 29 centimeters (11 1/2 inches) up to 2.4 meters (8 feet) in span, I have fiddled with the odd kite bridle over quite at few years. :-) I've pushed the limits of flyability with single-leg bridles and enjoyed smooth sailing with five-leg bridles on kites that suit them.
A few things can be learned about bridles from looking at various MBK kite designs.
That's from the tiny 1-Skewer ones right up to the absolutely huge Multi-Dowel kites.
Down below, I've gone through some bridle examples from these
proven kites, starting from one leg and working up to five legs.
In all the photos, a yellow dot represents a bridle-line attachment point. Each photo corresponds to the kite highlighted in bold type, closest to it in the text.
On this page, I have chosen to illustrate with photos of Dowel Series kites and one Multi-Dowel Series monster—the 2.4 meter (8 foot) rokkaku.
On this site, there's more kite-making info than you can poke a stick at. :-)
Want to know the most convenient way of using it all?
The Big MBK E-book Bundle is a collection of downloads—printable PDF files which provide step-by-step instructions for many kites large and small.
That's every kite in every MBK series.
The 1-Leg Kite Bridle
I guess this is only really a bridle if you attach a single short line to somewhere on the kite—terminated with a large knot so you can attach a separate flying line! Otherwise, if the flying line is just directly tied to a spar, it's really a 0 leg kite bridle, don't you think? That's what the MBK Tiny Tots Diamond uses, for the utmost simplicity. Just tie the flying line on, and leave it like that for the life of the kite!
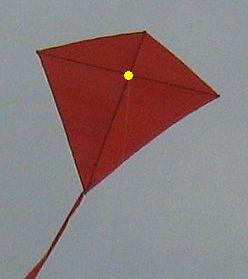 No adjustment required
MBK Simple Diamond
However, the much bigger MBK Simple Diamond uses a separate short line tied around the crossing point of the spars, with a small Loop knot tied into the free end. The crossing point is exactly 25% of the distance from nose to tail along the vertical spar.
A diamond constructed and bridled like this is not the smoothest flier, but with enough tail it will stay in the air reliably over a fair range of wind speeds. Some fliers actually appreciate kites that wiggle about a lot, tracing their erratic motion in the air with a long thin tail!
In theory, any flat or bowed kite will fly on a single leg bridle if it is attached at just the right spot. However, I found that some of my smaller designs had terrible flying characteristics with a single leg bridle! The 1-Skewer Sode is a particular example.
So one-leg bridles work fine for 25% diamonds but cannot be guaranteed to be much good for anything else, particularly in the smaller sizes. I do remember seeing an incredibly ornate and rather large Wau kite from Malaysia on a single leg bridle, though. And it flew great!
Also, there are those who like to modify larger kites to make
them fly reliably from a single attachment point. These designs are
known for being able to cope with a very stiff breeze, since
they flatten out and offer low resistance to the airflow. The trailing
edge is almost as high as the leading edge in flight, so the kite is
"floating on top" rather than straining away at a high angle to the
wind.
Deltas, or any other types with a single keel, are really using the equivalent to a two-leg bridle. The leading and trailing edges of the keel take the place of the two legs.
The 2-Leg Kite Bridle
This arrangement is very versatile and is used on a large range of single-line kites. It is a good compromise between simplicity and good flying characteristics. I use a two-leg bridle on the MBK 1-Skewer Sode, for example.
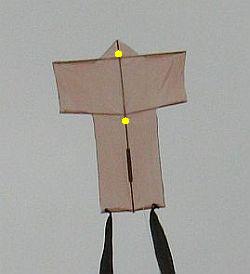 Adjust one knot for best flight
MBK 1-Skewer Sode
The most noticeable effect is that the kite's nose is prevented from bobbing up and down in response to changes in wind speed. Instead, the kite just rises or sinks smoothly. If the air gets too slow, a bit of wing waggle can occur as the kite struggles to keep flying.
Diamond kites in particular sometimes show the opposite behavior as well, getting up a wing waggle as the wind speed approaches the maximum the kite can handle.
No kite bridle is immune to a very sudden drop in wind speed however. If this happens, the kite will flop forward onto its face and float down until the wind picks up again.
So almost any accurately made and balanced kite will fly on two legs.
A two-leg bridle does have one important limitation. The horizontal spar(s) had better be strong enough! Near the top of the kite's wind range, a lot of bending force occurs near the middle of the spar. Of course, the stronger and therefore heavier the spars are, the more limited the light-wind performance of the kite will be. My little 1-Skewer kites are reliable fliers but aren't great in very light wind! They fly best in a moderate breeze.
The 3-Leg Kite Bridle
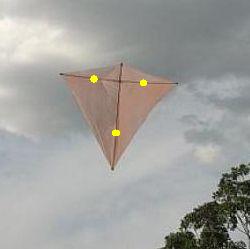 Steadier flight on three legs
MBK Dowel Diamond
I'm quite fond of the three-leg bridle as another step up towards smoother flying. With the horizontal or upper horizontal spar restrained at two points, the wings can't waggle anymore. The kite flies more smoothly over its entire wind range.
The bridle consists of a loop going from one side of the horizontal spar to the other. Another line then goes from the middle of this loop to well down the vertical spar.
Most diamonds fly on two-leg bridles, but the MBK Dowel Diamond uses three legs to fly better. Small to medium rokkakus also do nicely on a three-leg bridle, which saves a couple of knots compared to the standard four-leg arrangement!
Barn-door kites are fairly unique in that a three-leg bridle is the obvious, logical choice. One bridle line goes to each crossing point of the spars. I guess if the horizontal spar was high enough, you could get away with a two-leg bridle by attaching the top bridle line to the middle of the spar—a backward step if you ask me!
The 4-Leg Kite Bridle
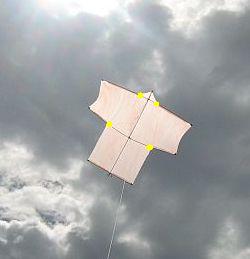 Very smooth flying on four legs
MBK Dowel Sode
A little more time and effort is required to make and adjust a four-leg bridle, but for some kites it's the logical choice. And of course it is the ultimate for smooth flying, keeping the frame of the kite quite rigid in flight.
Of the seven types of bowed kites I fly, the larger rokkaku and dopero are just made for four legs.
The big Dowel Sode is interesting from a bridling point of view. I can think of five ways of doing it, although a couple of them might require beefed-up horizontal spars! However, the four-leg bridle seemed quite a natural fit. This kite is a wonderfully smooth and high performance flier with that bridle arrangement.
With its two rear keels, the MBK Dowel Dopero kite has the equivalent of six legs actually, since the keels are anchored at two points each. But the keels are small, and most people would look at the lines and think four-leg bridle. It's certainly close enough.
The 5-Leg Kite Bridle
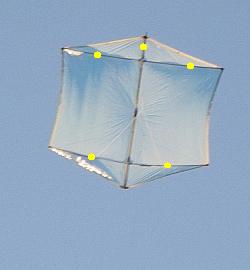 Extra support with 5-leg bridle
MBK Multi-Dowel Rokkaku
With the introduction of Multi-Dowel designs to my stable of homemade kites, five-leg bridles eventually made an appearance.
In the case of the huge barn-door, I felt the upper portions of the diagonal spars could do with a little help to stay straight when under heavy strain.
Also, with the towing point being between the leading edge and the horizontal spar, it made sense to have some attachment points closer to the leading edge.
With its five-leg kite-bridle
arrangement, the Multi-Dowel Barn Door flies smoothly over a wide wind
range. Its upper sail area is well supported and keeps its shape under
the most trying circumstances!
The other kite sporting a five-leg bridle is the Multi-Dowel Rokkaku. Having an extra line coming from the vertical spar, near the nose, allows the bridle lines on the horizontal spar to be spaced further apart. This of course keeps the upper portion of the kite more rigid in fresh winds—anything to extend the wind range on a design that is a bit limited in this respect!
Some Kite-Bridle Fine Points
Spacing of Attachment Points
On a horizontal spar, it's worth considering how far apart the attachment points are.
If the spacing is far too close, then the resistance to wing waggle is much less. This arrangement is approximately like just one line coming from the middle, hence the kite will behave that way too! Also, the center will still be under a lot of strain in strong winds. There's no point.
If the kite bridle lines are attached too near the tips, this again causes a bending problem near the middle of the spar. When the wind picks up, your diamond might start to look more like a sled, before plummeting to the ground with a snapped spar! That's an extreme scenario. More likely, though, is that the kite will simply fly poorly due to flex in the vertical spar. This is what a friend of mine found when flying a large rokkaku. By supporting the vertical spar with a bridle line or two, the problem disappears!
What about with no bridle lines to the vertical spar. An easy rule of thumb is to try and get a roughly equal amount of sail area on the inside and outside portions of the sail. For most kite shapes, this ends up being a little less than halfway out along the horizontal spar.
Vertical spars can bend too, if the wind is strong enough and the bridle is connected to the extreme ends!
A rough rule of thumb is to place the top bridle line, if any, between the nose of the kite and the horizontal spar—or the upper horizontal spar if the kite has more than one. The lower line can go between the middle of the vertical spar and the bottom tip—but closer to the middle than the tip!
I've seen box kite plans with the bridle attached at top and bottom of a longitudinal spar—crazy! The bottom line should never be attached too near the tip.
Sliding Knots
Wonderful things these are! The first application of this that most people bump into is the towing point of a simple two-leg kite bridle. The flying line can be attached to the bridle loop with a sliding knot such as the Prusik.
In flight, the knot stays where it is, setting the length of the
upper and lower bridle lines. However, with the bridle in your hand,
it's easy to slip the knot along the bridle loop a little to change the lengths of the upper and lower bridle lines.
This is the way many homemade kites are tuned for low- or high-wind conditions. High wind requires the knot to be a little closer to
the nose end of the kite. In low winds, the kite will fly higher when
the knot is shifted back toward the tail end a little—a little.
Small changes can make big differences in how the kite flies, and this
can thwart some would-be kite makers! The adjustments are a skill soon
mastered if the flier persists.
The second main use of sliding knots is holding the center point of a horizontal bridle loop. For example, a typical rokkaku has an upper horizontal bridle loop and a lower horizontal bridle loop. A third bridle line then connects these two loops. Attached at each end by ... a sliding knot. Besides allowing for adjustment to dead center, one or both of these knots can also be used to trim out any slight turning tendency the kite has. Handy!
I use sliding knots in these ways for all my kites that have more than a single-leg bridle. The Prusik takes some practice to remember correctly, but it works extremely well! I usually tie a simple single knot into the end of the line first, though, to prevent the possibility of the Prusik ever pulling right through and gulp ... letting go!
Line Weight
I have always used the same weight for bridle line as the
heaviest flying line ever used for the kite. This takes care of all
eventualities and, in the case of multi-leg bridles, is more than ample
for strength. In fact, I once considered experimenting with using lighter bridle lines
in such a way that the flying line is still guaranteed to break first,
in strong wind conditions. Lighter means thinner, which means a little
less drag and hence a more efficient kite!
As mentioned earlier, there's more kite making on this site than you can poke a stick at. :-)
Want to know the most convenient way of using it all?
The Big MBK E-book Bundle is a collection of downloads—printable PDF files which provide step-by-step instructions for many kites large and small.
That's every kite in every MBK series.
