- Home Page
- Soft Kites
- ... Octopus Kite
How to Make an Octopus Kite
Step by Step—Page 4 of 5
The MBK Octopus
Making Tubular Tails
Measuring and Cutting Two Tails
These tails start out as tapered ribbons cut from a long sheet of plastic. Painters' drop-sheet plastic is readily available from hardware stores.
Two tails can be started by measuring,
marking, and cutting a long thin rectangle of plastic in half along
its length. Use some plastic of the same type as you have used for
the lower surface of the kite.
 A plastic rectangle cut to the size required for two tails
- Cut out a plastic rectangle with a short side length of 20 cm (8 in.) and a long side length of 300 cm (120 in.). If the original plastic sheet is not long enough, just join two or more pieces together with sticking tape on both sides of the join.
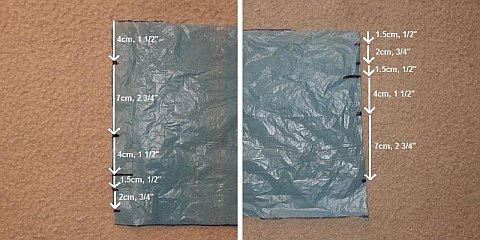 Left and right ends measured up
- Using ruler and marker, draw marks as indicated in the photo on the left.
- Moving to the other end of the plastic, draw marks as indicated in the photo on the right.
 Rectangle cut to two tapered pieces of tail plastic
- Note how one mark at each end is longer than the others. Draw a long straight line from one of those marks to the other long mark at the other end.
- Cut along the line just drawn. The photo shows enough plastic so you can see the taper in both shapes.
Taping Up Tail Tubes
Take one piece of tail plastic, and smooth out the wider end on the floor.
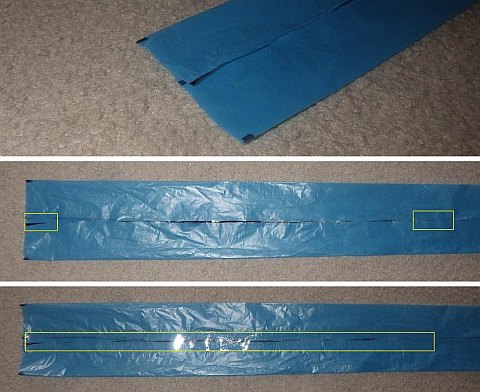 A section of tail tube folded and taped
- Top photo. Starting at the edge where the marks are, fold the plastic up from the bottom then down from the top, then crease the folds so the flaps stay down—at least for 30 cm (12 in.) or so. Line up the creases with the marks as shown.
- Middle photo. To hold the flaps in place, use short bits of sticking tape as shown in yellow. Try to maintain the small amount of overlap along the whole join. Also, try to keep the join halfway between the top and bottom of the plastic.
- Bottom photo. Complete the join by laying down tape over the two small bits of tape.
 Tail taped all the way to thin end
- Move along and do another section similarly, using another bit of tape to tack down the plastic before taping the whole section.
- Keep going, section after section, right along to the narrow end as shown in the photo. Keep the amount of overlap about the same all the way along.
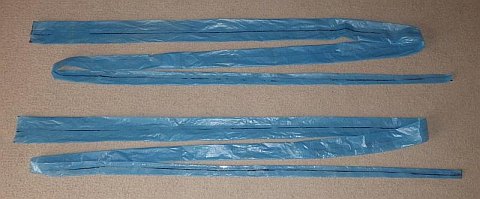 Both completed tube tails
Do the other tail tube the same way. There they both are in the photo, folded into S-bends.
Constructing Remaining Tails
It's an octopus, so there are six tails to go!
The process is exactly the same, so no instructions are needed here. However, I do recommend that you use as light a grade of plastic as possible for these outer tails. I used the lightest available painters' drop-sheet plastic, which appears almost clear when unfolded to a single thickness.
Very light plastic is harder to work with,
but it will result in a more stable, more efficient octopus kite.
Also, near sunset, all that writhing clear plastic tubing will light
up and look amazing!
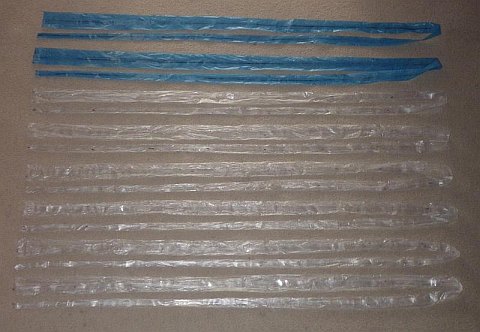 All eight plastic tail tubes completed
- Do the other tail tube the same way. There they both are in the photo, folded double.
Extending Tails
After flight testing, it was discovered that
considerably more tail length was needed! Hence, each tail
will now be extended by sticking on a plastic cylinder. So,
both ends will be as wide as the wide end of the tails
you have already done.
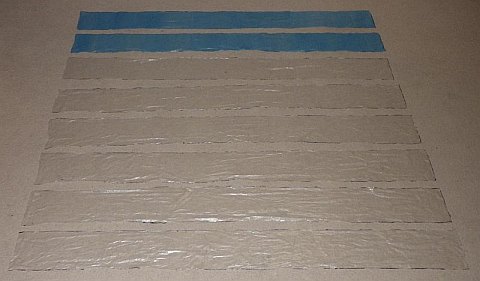 Plastic rectangles cut for the eight tail extensions
- Cut two plastic rectangles from some spare lower surface plastic. The short sides should be 15 cm (6 in.) long, and the long sides should be 150 cm (60 in.) long. There they are, near the top of the photo above.
- Cut six more rectangles to the same size from the lighter tail material you have used before.
Now to form the cylinders, using the same method as you used for the tapered tails already done.
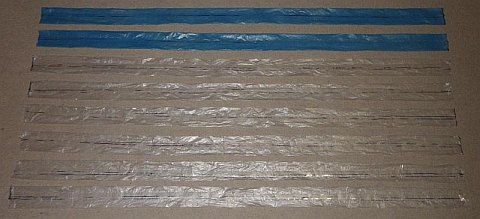 The plastic taped into cylinders
- Overlap the long edges of a plastic rectangle by about 0.5 cm (1/4 in.), and join with sticking tape—along the whole length.
- Repeat the process to make another seven cylinders. All eight are in the photo up there.
Joining a
cylinder (left) to a tapered tail (right) is shown below, although over this distance
you can't see any taper:
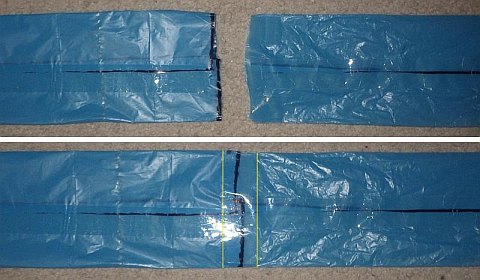 Extension taped to existing tail
- Bring together one end of a cylinder and the wide end of a tapered tail made of the same type of plastic. See the top photo.
- Insert the tail into the cylinder by about 0.5 cm (1/4 in.), and tape around the join with sticking tape. See the bottom photo, where yellow lines indicate the sides of the sticking tape.
- Tape up the remaining seven tails in the same way.
OPTIONAL: Drawing Suckers
Did you do the eyes? To make your octopus look even more "like a bought one," why not take your black permanent marker pen and draw in some suckers.
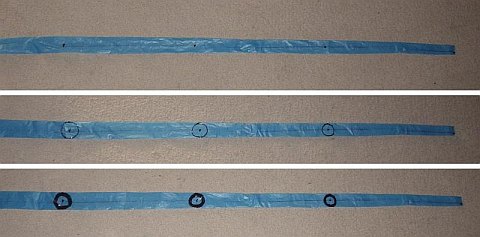 How to draw suckers onto a tentacle
- Place a plastic tubular tentacle on the floor with the taped join against the floor.
- Measure 30 cm (12 in.) away from the narrow end of the plastic. Make a dot there, mid-width.
- Top photo. From the dot you just marked, measure a further 30 cm (12 in.) and make another dot. Keep doing this until you have made eight dots. The photo shows the first three dots near the narrow end of the plastic.
- Middle photo. Carefully draw in a circle around each dot with a single stroke of the pen. As shown, extend the circle to the sides of the flattened plastic tube.
- Bottom photo. Go back, and thicken up the circles to your liking by adding more black to the inside of the existing circles.
- Now measure and draw eight suckers on the seven remaining tentacles. Whew! Actually, you can save some time by using the first tail as a template. Lay tails side by side to get the sucker spacing right.
Note: Do you think a real octopus would have perfectly circular suckers? Of course not, so don't fret if your hand drawn ones aren't mathematically circular. It'll still look great in the air!
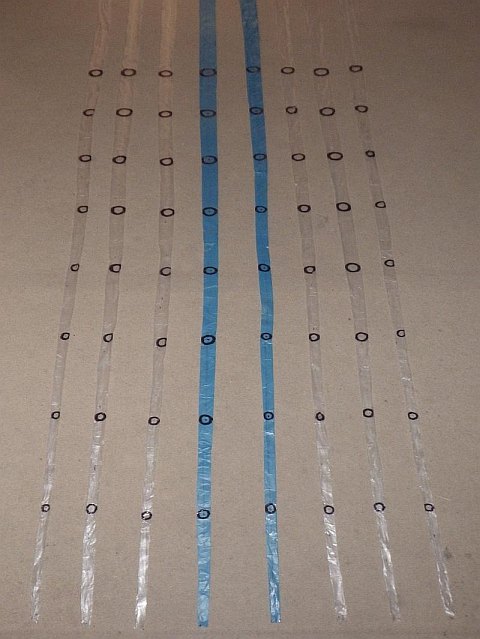 Suckers drawn onto the tapered section of each tail—64 in all
Connecting Tails to Head
If you have drawn suckers, ensure that they are
all facing the same direction as the eyes. You don't want them facing
random directions or the sky. :-)
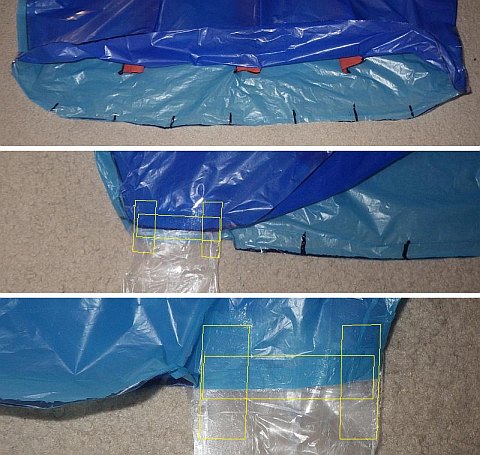 A tubular tail inserted and taped
- The top photo shows how the trailing edge should be marked into eight equal sections. The easiest way is to line up three marks with the middle ribs, giving four sections. Then just divide each section into two, making eight altogether.
- Insert 1 cm (1/2 in.) of the the wide end of a tail into the head as shown in the middle photo. Apply sticking tape as indicated. The vertical pieces should be about 5 cm (2 in.) long.
- Flip the head over, and apply more tape in exactly the same way as before. See the bottom photo.
Done that first one? Now add all the other
tubular tails, taking care to make the darker heavier ones number four and number five, counting in from one side. Also, take care to keep each
tail between the marks. A little bit of space or a little bit of
creased plastic doesn't matter at all.
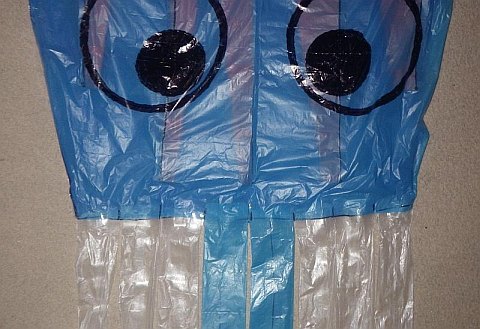 All tubular tails taped into the octopus head
In flight, the upper and lower portions of the trailing edge separate and the flat tails become circular tubes due to air pressure.
As mentioned earlier, there's more kite making on this site than you can poke a stick at. :-)
Want to know the most convenient way of using it all?
The Big MBK E-book Bundle is a collection of downloads—printable PDF files which provide step-by-step instructions for many kites large and small.
That's every kite in every MBK series.
