- Home Page
- Better Kites
- ... Sode Kite
How to Make a Sode Kite
Step by Step—Page 2 of 3
The MBK 1-Skewer Sode
How to Make a Sode Kite
Spars
Now you need another three bamboo skewers. The photo shows them laid over the sail before being snipped to length with scissors.
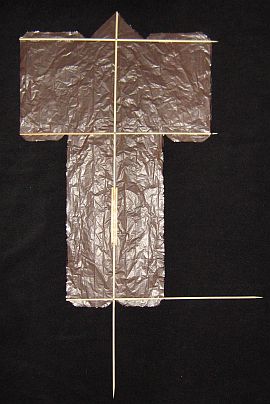
- Lay down the glued skewers over the center crease of the plastic, lining up the non-pointy end with the top corner of the plastic. Snip off the other end so the skewer lines up with the bottom edge of the plastic as well. As already mentioned, this is the vertical spar.
- Lay down another skewer across the top left and right corners of the sail, and again snip to length, removing the point. Also, make an easily seen mark on the skewer at the exact center point. This is the upper horizontal spar.
- Using a sharp corner, perhaps a blade of the scissors, make an indent in the bamboo at the center point you marked.
- Do those last three steps again to make another spar. This will be the lower horizontal spar.
- Finally, lay another skewer across the bottom edge of the sail, and snip to length. This is the bottom horizontal spar. Note that the camera has caused a little curvature in the picture; to your eye, everything should look square.
Those indents will help ensure the bamboo bends at the right spot when you later create dihedral!
How to Make a Sode Kite
Attaching Sail
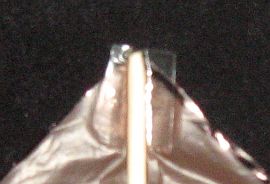
- Lay down the vertical spar skewer over the sail, and wrap a short length of clear sticking tape around the top tip, securing it to the top corner of the sail. The photo shows the top tip in closeup.

- Stick a short length of sticking tape over the vertical spar near the lower end of the sail. See the photo.
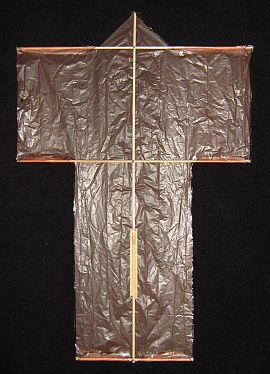
- Lay down the upper and lower horizontal spar skewers, and attach their tips to the corresponding corners of the sail. Use the tape sparingly.
- Attach the bottom horizontal spar to the plastic by wrapping tape around the tips, like all the other spars.
- Fold the tabs over the skewers and stick down with several small squares of tape. The kite should now look like the photo.
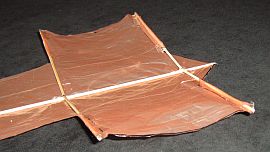
- Bend the upper and lower horizontal spars in the middle (one at a time) until they start to crack at the indent! Carefully increase the bend until you can get the kite looking like the one in the photo. There should be about 20 degrees of angle from the floor on both sides.
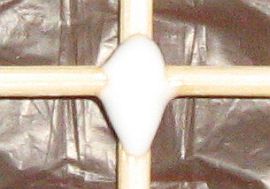
- Dribble some wood glue all around where the bamboo has cracked—see the photo.
- Wait for the glue to dry. It should still be flexible enough to allow more adjustment of the dihedral if necessary and yet stiff enough to hold firm in flight. If not, just add some more glue!
How to Make a Sode Kite
Bridle
Dacron line in 20- to 50-pound strength is suitable for all the Skewer Series kites.
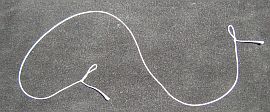
- Cut off some Dacron line to a length of 1.5 SL (44 cm, 17 in.), and tie a very small Loop knot into each end. See the photo.
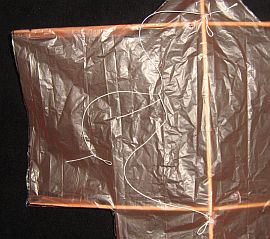
- Poke a hole in the plastic sail just above where the upper horizontal spar crosses the vertical spar.
- Poke another hole in the plastic sail just below where the lower horizontal spar crosses the vertical spar.
- Poke the Loop knots through the holes and tie off around the vertical spar with a Double-Wrap Slip knot.
- Now take a length of flying line about half a skewer long, and tie one end to the bridle line with a Prusik knot. Tie a small Loop knot into the other end. There's the whole bridle in the photo.
- Secure each knot on the vertical spar with a tiny blob of wood glue.
How to Make a Sode Kite
Tail
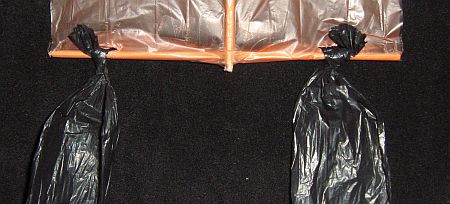
- Cut out a long thin rectangle of colored plastic for the tail. Mine is black to contrast with the orange sail. Make it 12.0 SL (350 cm, 140 in.) long and 0.2 SL (5.8 cm, 2 1/4 in.) wide. Knot pieces together, if necessary, to get the full length. Avoid taping, because it adds weight!
- Slit the plastic sail near each tip of the bottom horizontal spar, just enough to slip the ends of the tail through. Tie off each end of the tail with a single Half Hitch. Pull until firm, then snip off any excess plastic poking out of the knot. See the photo for the end result.
At this point, you've finished making the 1-Skewer Sode!
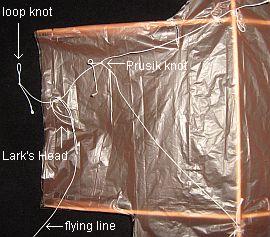
To attach the flying line, just Lark's Head the flying line to the short kite line as in the photo.
Coincidentally, the position of the Prusik knot in the photo shows you how to set the bridle for moderate winds.
In lighter winds, you could try shifting the Prusik lower, by just a few millimeters (a small fraction of an inch).
As mentioned earlier, there's more kite making on this site than you can poke a stick at. :-)
Want to know the most convenient way of using it all?
The Big MBK E-book Bundle is a collection of downloads—printable PDF files which provide step-by-step instructions for many kites large and small.
That's every kite in every MBK series.
