- Home Page
- Soft Kites
- ... Parafoil Kite
How to Make a Parafoil Kite
Step by Step—Page 3 of 3
The MBK Parafoil
Tying the Short Bridle Line
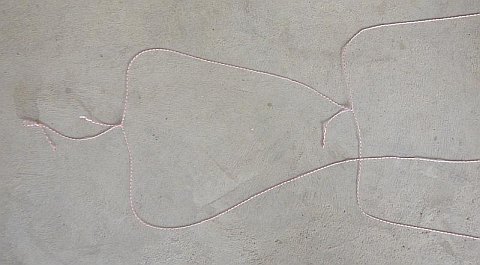 All bridle knots done, ready to attach flying line
- Cut off a piece of flying line just 30 cm (12 in.) long.
- Tie a Double Loop knot into one end—on the far left in the photo above.
- Tie the other end around the central bridle line with a Prusik knot or any other sliding knot. See the photo above, which also shows the sliding knot on the bridle loop.
Note: The central bridle line is the one running off to the right, between the other two lines of the bridle loop.
Final Check
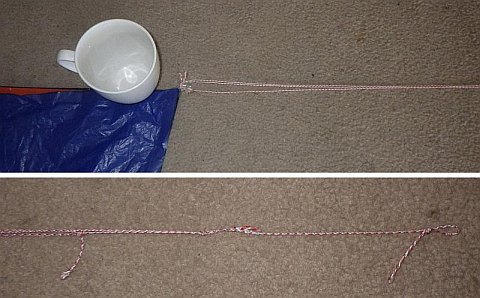 Bridle knots adjusted
- Lay the kite down with all three bridle attachment points as close together as possible. Weigh the keels down with a mug or other handy weight. See the upper photo.
- Pull on the short bridle line to stretch the other bridle lines out.
- Adjust both of the Prusik knots until everything is lying straight with no slackness in any line. See the lower photo. Double check that the attachment points on the keels are still all in the same spot.
- The kite should fly like this, although you can experiment with fine tuning later—for example, to correct a tendency to pull to the left during gusts.
Making the Drogue
The Plastic and Tape
This parafoil copes much better with fresh winds when a small drogue is attached to the rear of the central keel.
Start with a piece of plastic at least 30 cm x
30 cm square. Fold the plastic in half, down the middle, with the
crease on the left. I have used orange plastic to contrast with my
mainly blue kite.
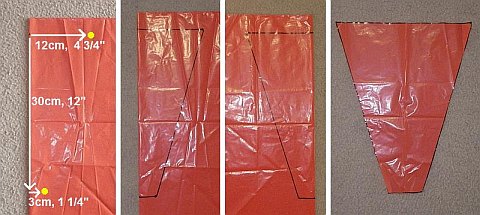 One side of the drogue measured and cut
- Photo 1: Make a mark on the crease near the top. Then measure from there as indicated in the photo, making dots on the plastic.
- Photo 2: Using marker and pen, rule black lines to connect the dots.
- Photo 3: Flip the plastic over, and trace over the lines showing through.
- Photo 4: Open out the plastic, and cut the lines with scissors. There's one half of your drogue!
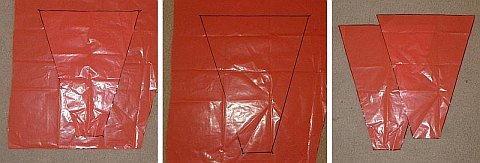 The second side copied and cut
- Lay the shape you have just cut out over some more plastic, and mark the four corners. See the photo on the left.
- Draw lines between the marks to duplicate the shape as in the middle photo.
- Cut the second shape out—there it is with the first one, in the photo on the right.
 Seams and leading edge taped
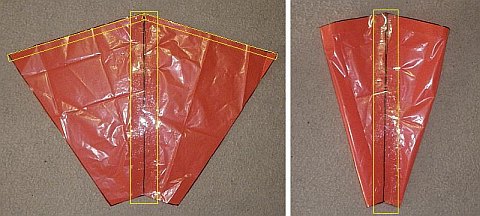
- Bring two of the long edges together as in the photo on the left, and tack them together with bits of sticking tape. Also run sticking tape across the two top edges of the plastic.
- Run packing tape down the middle, which is also indicated in the photo on the left. Trim any overhanging tape with scissors.
- Keeping all the tape on the outside of the drogue, tack the outer two long edges together with bits of sticking tape before running packing tape down the entire length. See the photo on the right.
 Bridle holes added
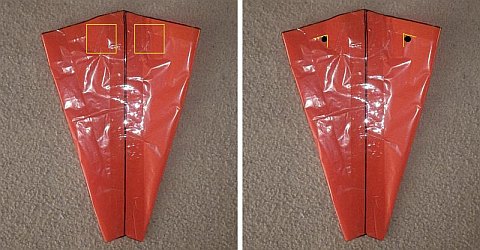
- Stick squares of packing tape where indicated in the photo on the left.
- Punch holes in the plastic where the edges of sticky tape and packing tape meet. Black dots show where the holes are, and the tape edges are highlighted in yellow. See the photo on the right.
- Flip the plastic over, and add packing tape squares and holes to the other side too. So you should end up with four holes in the drogue altogether. Ideally, the holes should be equally spaced around the rim.
The Lines
First the four-point bridle lines:
 How to thread and secure drogue bridle lines
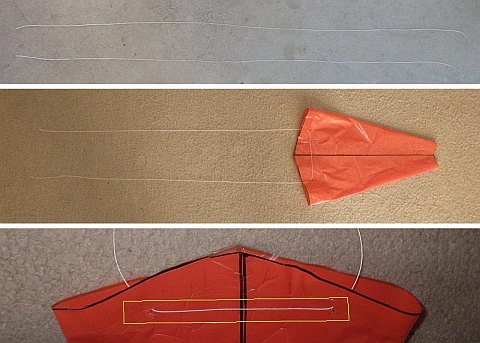
- Cut off two pieces of 20-pound Dacron or nylon line, each to a length of 120 cm (47 in.). See the top photo.
- Slip one line through a pair of holes in the drogue. The middle photo shows how. Try to get the lengths as equal as possible.
- Secure the line with a strip of sticking tape as shown in the bottom photo.
- Flip the plastic over, and secure the other line through the other pair of holes similarly.
Like to see a video clip? Just scroll down to near the end of this page.
 Drogue lines brought together and knotted
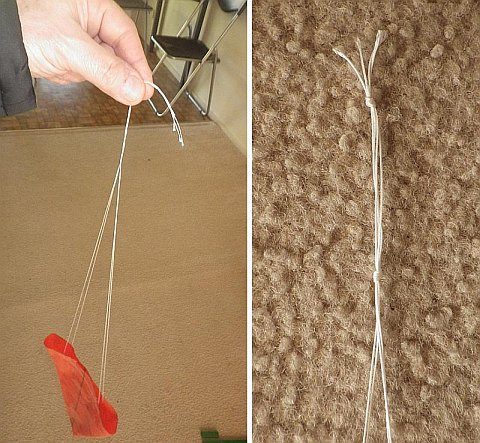
- Hang the drogue from your hand, and adjust so the seams are hanging perfectly vertical. See the photo on the left.
- Put a couple of Multi-Strand Simple knots into the lines, fairly close to the ends. Trim the ends with scissors for a neat look. See the photo on the right.
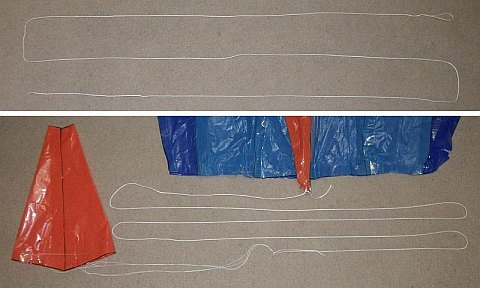 The tether connecting central keel and the drogue
- Cut off a piece of 100-pound line to a length of 3 m (10 ft.), and tie a Loop knot into one end. See the upper photo. Heavier line is just easier to handle and see; that sort of strength certainly isn't needed here!
- Pass the unknotted end of the line through the hole in the rear end of the central keel and secure with several Half Hitches.
- Secure the other end to the drogue bridle with a Lark's Head behind the first knot. See the lower photo.
After Kite Completed
Packing the Kite
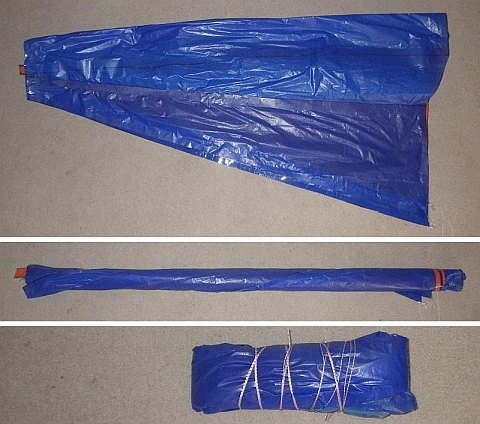 Fold, roll, fold twice more, and wind bridle
- Fold the kite in half, down the centerline as in the top photo. If you have the drogue attached, just lay it flat over the keel. The tether line can go in too, loose.
- Roll from the top down into a narrow tube—as in the middle photo. Out in the field, it's best to have the wind on your back and roll away from you!
- Starting from the left, fold in half, and then fold in half again.
- Wind the bridle lines around as in the bottom photo. Now it's all ready to stow!
Flying!
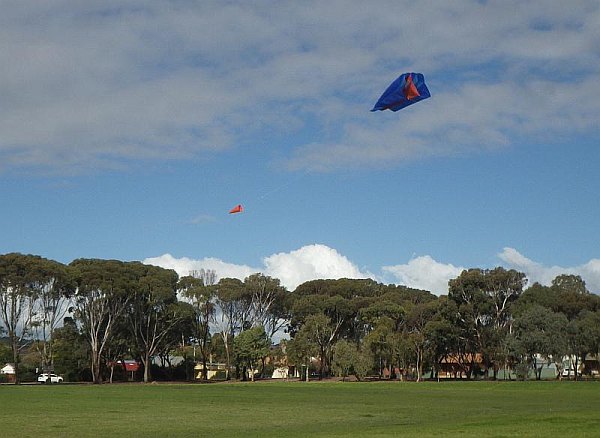 Attach line, inflate, let out line
After unrolling the kite at a flying field, your flying line can be tied through the Loop knot of the bridle. That's it; you're ready to fly.
Alternatively, you can Lark's Head the flying line behind the knot. This makes it easier to attach the flying line and take it off again.
Avoid flying in very windy weather.
If the kite seems to be moving around a lot due to high wind speeds, attach the drogue. Of course, for simplicity, you can just leave the drogue on all the time. It looks good too, hanging out the back!
If the kite is struggling to stay up in light wind, try using lighter flying line, and take the drogue off.
I hope you enjoyed learning how to make my four-cell
parafoil kite design and its drogue!
As mentioned earlier, there's more kite making on this site than you can poke a stick at. :-)
Want to know the most convenient way of using it all?
The Big MBK E-book Bundle is a collection of downloads—printable PDF files which provide step-by-step instructions for many kites large and small.
That's every kite in every MBK series.
