- Home Page
- Soft Kites
- ... Parafoil Kite
How to Make a Parafoil Kite
Step by Step—Page 2 of 3
The MBK Parafoil
Attaching Lower Surface to Central Keel
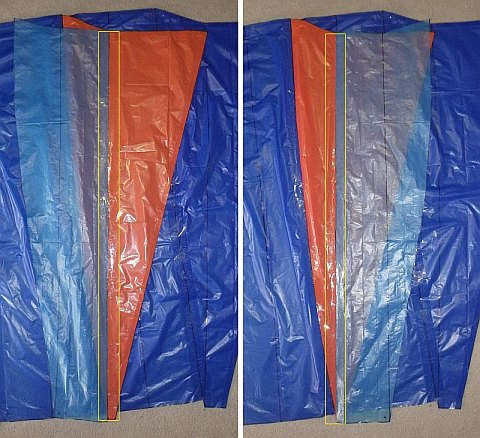 A lower surface panel taped to the central keel
- Referring to the photo on the left, position a lower surface shape along the black line on the keel. Face the shape's tape edging toward the floor as you line things up.
- You know the drill. Hold in place with small bits of tape first, then run one long length of packing tape as illustrated by the yellow rectangle.
- Now flip the lower surface plastic over, flatten the join, and run packing tape down the whole length. See the photo on the right.
Attaching Divider to Upper Surface
Note that the divider is part of the plastic panel
already attached to the central keel:
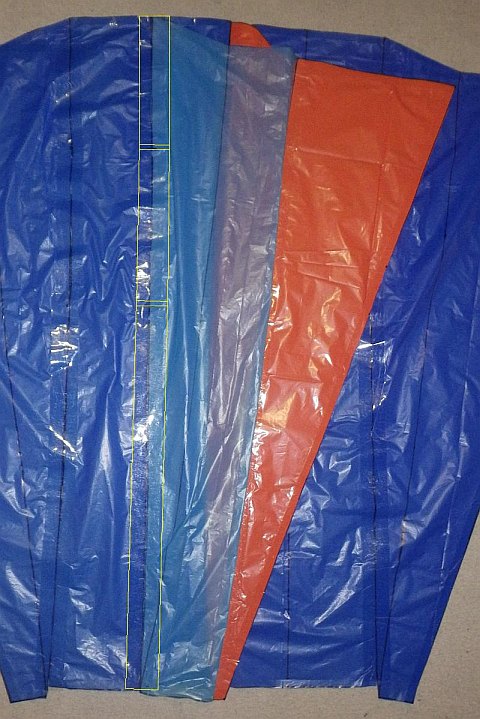 Divider taped to upper surface
- Look carefully at the photo. See how the lower surface plastic is drawn across and attached with packing tape—on one side only—to the nearest black line on the upper surface plastic. The yellow rectangles show where each edge of the divider is taped with small overlaps. That's one cell down, three to go!
Attaching Lower Surface Rectangle—a)
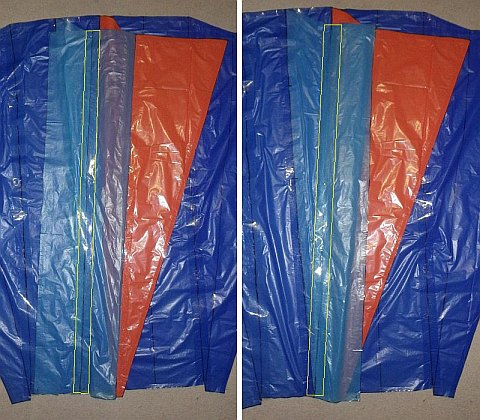 Lower surface rectangle taped to divider
- With the edging tape facing the floor, line up the right-hand side of a lower surface rectangle with the guide line on the lower surface plastic already in place.
- Tape the join with packing tape over the full length. See the yellow rectangle in the photo on the left.
- Flip the rectangle over to the right, flatten the join, and tape it along the whole length—again, using packing tape. See the photo on the right.
Attaching Lower Surface Rectangle—b)
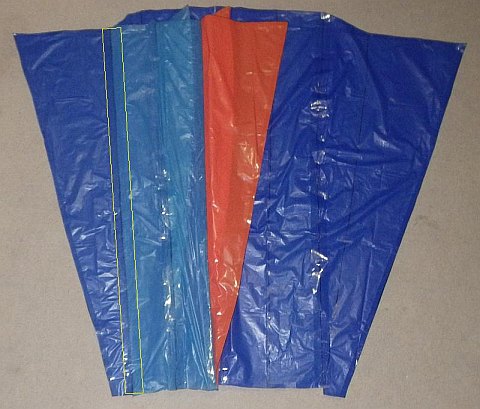 Lower surface rectangle taped to side keel
- Line up the free edge of the lower surface rectangle with the guide line on the side keel of the upper surface plastic.
- Lay down packing tape along the full length as indicated by the yellow rectangle. As usual, you can make that easier by using a few short bits of sticking tape first. Half the sail is starting to look like a parafoil, up the top there!
Completing the Lower Surface
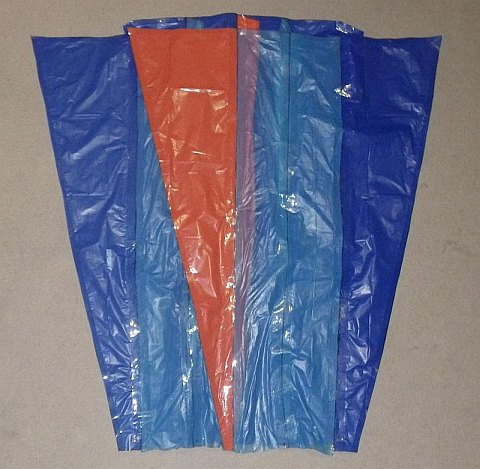 The entire lower surface attached
- Starting from the page titled Attaching Lower Surface to Central Keel, work through all those steps again. This time it's on the other side of the kite.
- When you are finished, all the plastic shapes should be used up, and the result should look like the photo above. It's really starting to look like a parafoil now!
Reinforcing Air Intake
Lay the kite down with the lower surface plastic against the floor.
View the kite from the front while lifting the upper-surface plastic away from the floor a little.
Notice how there are eight T-shapes in the air intake,
including where the side keels meet the lower surface plastic. See
below for a closeup of one such T-shape:
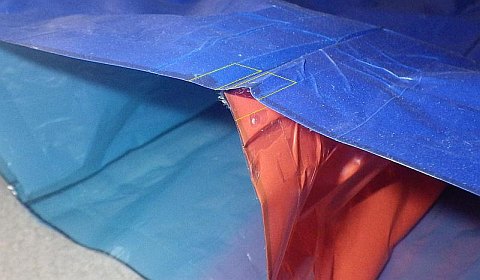 Where to tape air intake
- Find the top center T-shape illustrated in the photo.
- Using 5 cm (2 in.) strips of sticking tape, wrap one strip around each of the three leading edges. The yellow lines in the photo should give you the right idea.
- Repeat this process for all the other T-shapes. All this taping will help extend the life of the kite—especially in fresh winds!
Closing the Trailing Edge
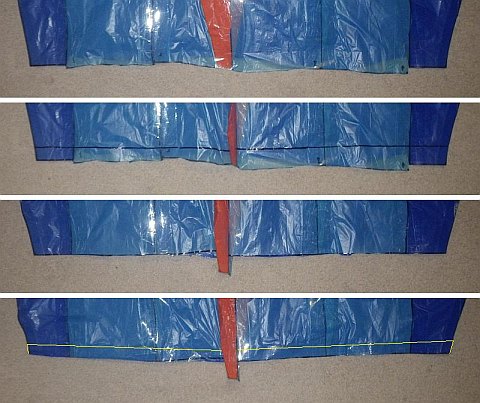 Trimming and closing the rear end of the kite
- At this point, the rear end of the kite will be somewhat untidy as in the first photo.
- Draw a straight line across the trailing edge, skipping the central keel as in the second photo.
- Following the line, snip across both layers of plastic with scissors as in the third photo. Again, skip the central keel.
- Finally, fold packing tape around the edge on either side of the central keel as in the fourth photo. Snip off any excess tape with scissors.
Drogue Attachment
The pictures show the tail end of the central
keel:
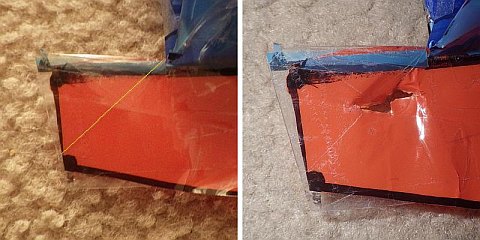 Reinforcing and hole punched for drogue line
- Place a short strip of sticking tape across the corner at an angle as shown in the photo on the left. Wrap any overhang around to the other side. There is already another strip of tape running along the bottom edge of the keel.
- Flip the keel over, and do the same on the other side.
- Punch a hole through the plastic in an area not covered by sticking tape. The drogue line will be tied on here later.
Making the Bridle
Bridle Attachment Points
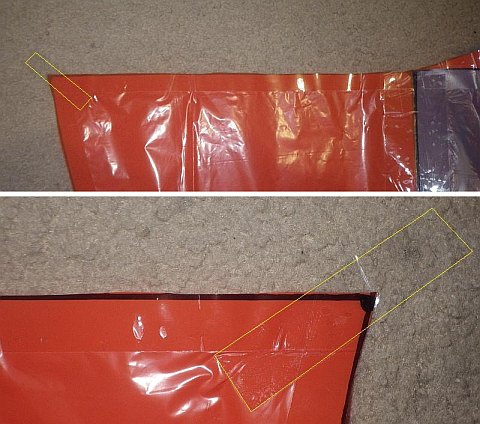 Attachment point tapes stuck on
- Place a 5 cm (2 in.) length of sticking tape over the free corner of the central keel as illustrated by the yellow rectangle in the top photo. Try not to let the tape stick to the floor or tabletop.
- Flip the keel over, and stick another similar piece of tape right over the first one, pressing them together. See the closeup bottom photo.
- You know what's coming. Do exactly the same for the extreme left and right portions of the upper surface plastic, which in fact are the side keels.
Tying the Attachment Points
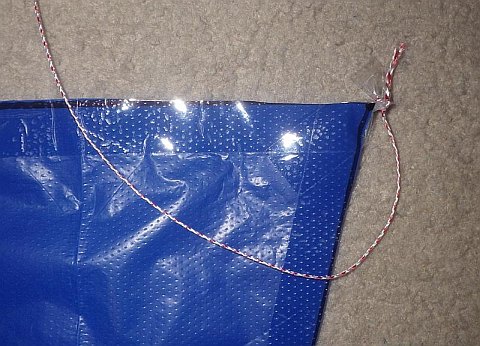 Attachment point tape crushed and tied
- Cut off a piece of the flying line, 4.6 m (15 ft.) long.
- Tie one end of the line to a pair of towing point tapes on one side keel as in the photo. Use any knot you know, but make it tight to crush the tape. A reliable method I prefer is to use a Double Wrap Slip knot. It helps to fold the tape in half before winding the line around and tightening the knot.
- Tie the other end of the line to the other side keel attachment point in the same way. This line is called the bridle loop.
- Cut off another piece of flying line, this time 2.5 m (8 ft.) long.
- Tie one end of this line to the central keel attachment point, just like the others.
The Bridle So Far
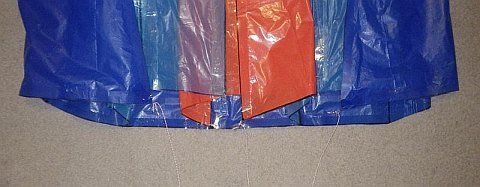 The bridle loop and central bridle line attached to the sail
- The above front-on photo just makes it clear where you should be up to. A long bridle loop connects the two side keels, while the central bridle line is attached to the orange central keel. All three keels are folded in the photo.
- With the kite suspended from the loop, the central line should be somewhat longer than the two side ones.
Tying the Central Bridle Line
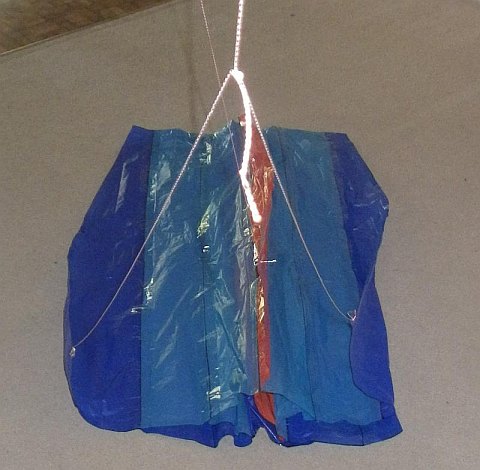 Central bridle line tied to bridle loop
- Using a sliding knot such as the Prusik, tie the central bridle line to the middle of the bridle loop. The photo shows the keels partly suspended by all three bridle lines.
As mentioned earlier, there's more kite making on this site than you can poke a stick at. :-)
Want to know the most convenient way of using it all?
The Big MBK E-book Bundle is a collection of downloads—printable PDF files which provide step-by-step instructions for many kites large and small.
That's every kite in every MBK series.
