- Home Page
- Better Kites
- ... Delta Kite
How to Make a Delta Kite
Step by Step—Page 2 of 3
The MBK 1-Skewer Delta
How to Make a Delta Kite
Frame
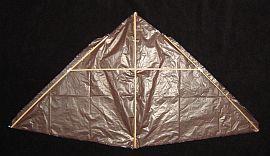
- Select the straightest skewer you can find, and lay it down the centerline of the sail. Snip the skewer to length, removing the point so it lines up with the plastic at each end. This is the vertical spar.
- Select two more skewers that have very similar stiffness. Judge this by bending them one at a time, or perhaps use your creativity to judge this some other way!
- Place these two skewers along the fold lines of the tabs. Snip both skewers to length, removing the points so they are as long as the tabs. These are the leading edge spars.
- Measure 0.42 SL (12.2 cm, 4 3/4 in.) from the top end of the vertical spar, and make a mark on it there. Select another skewer, snip the point off, and place it over this mark so each end sits over a leading edge spar as in the photo. This is the spreader.
- Apply glue where the spars cross each other but not onto the vertical spar. While this is drying, you can get on with the keel. Hey, it's starting to look like a delta!
How to Make a Delta Kite
Keel
Dacron line in 20- to 50-pound strength is suitable for all the Skewer Series kites.
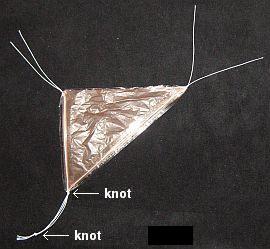
- Mark out a triangle on some spare plastic as per the dimensions in the template, and cut it out.
- Tape down two lengths of flying line onto it, running along both edges that meet at the towing point. The length is not too important; just take the photo as a guide.
- Flip the plastic over, and tape down another two lengths of flying line directly over the first two.
- Reinforce the keel corners by sticking down and wrapping around short lengths of tape.
- Where the four pieces of line come together, tie a Multi-Strand Simple knot close to the plastic, then tie a second one further out as per the photo.
- Also, knot the lines at the other two corners, using the same kind of knot. Adjust them so they are flush with the plastic.
At this point you need to make sure the glue is dry on the bamboo frame. If it is:
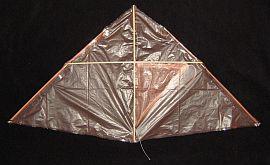
- Fold over and tape down the sail tabs over the leading edge spars, using two lengths of sticking tape on each side.
- Fold tape over the ends of the vertical and leading edge spars, securing them to the plastic.
- Poke a hole in the plastic sail just above where the spreader crosses the vertical spar. Thread the upper keel lines through and tie off tightly with a Granny knot.
- Using the keel to find the exact spot, poke another hole in the sail near the trailing edge. Thread the lines through and tie off tightly, again using a Granny knot.
- With the keel flush against the plastic sail, add sticky tape along the full length of the keel, attaching it to the sail plastic. Flip the keel over, and do the other side too.
- Put a small drop of wood glue on the knots that attach the keel to the vertical spar. In the photo, you can see the keel through the main-sail plastic.
How to Make a Delta Kite
Tail
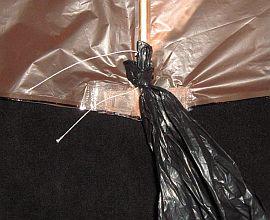
Have you read the page on making kite tails? Assuming you have:
- Make a tail at least five times the length of the kite itself.
- To attach the tail to the kite, just push one end between the vertical spar and the sail, at the bottom end of the kite.
- Then thread the other end of the tail through the loop you just pushed through.
Simple! If you don't tighten it too much, the tail will always be easy to remove later, even after flying.
At this point, you've pretty much finished learning how to make a delta kite!
How to Make a Delta Kite
Prepare to Fly
Put a little bow in the spreader away from the sail. Do this by gently bending the bamboo with both hands with your thumbs in the middle of the bend. You might have to try a few times before the bamboo deforms a little.
The purpose of this is to put a little slack in the sail, which will make the kite more stable. If you overdo it and the bamboo cracks, just rub some wood glue into the bend!
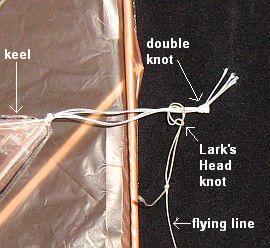
Finally, make up a flying line and attach it to the bridle with a Lark's Head knot as shown in the photo.
With this kite, I'm confident that if you build it and attach the keel with reasonable accuracy according to the plan, it should need no further adjustment—just like the bought ones! You might need to experiment with using a bit more tail if the kite loops around too much.
As mentioned earlier, there's more kite making on this site than you can poke a stick at. :-)
Want to know the most convenient way of using it all?
The Big MBK E-book Bundle is a collection of downloads—printable PDF files which provide step-by-step instructions for many kites large and small.
That's every kite in every MBK series.
