- Home Page
- Better Kites
- ... Box Kite
How to Make a Box Kite
Step by Step—Page 3 of 3
The MBK 1-Skewer Box
How to Make a Box Kite
Flying!
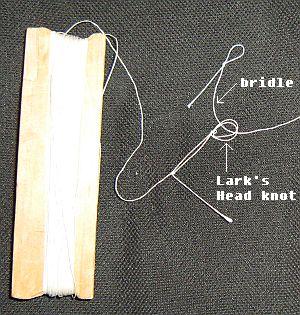
Finally, make up a flying line and attach it to the bridle with a Lark's Head knot. See the photo below.

Assuming there is plenty of breeze outside, just dangle the kite at arm's length until the wind catches it.
As long as you feel the kite pulling, let out line slowly by letting it slip through your fingers.
Another approach is to get a helper to hold the kite up and let it go, with maybe 15 or 20 meters (50 feet) of line let out. This way, the kite soon gets high enough to make it easy to let more line out. That's assuming there is plenty of wind!
If this box kite doesn't fly, there is only one explanation—not enough wind! If it loops around in one direction, try adding a little tail to one side of the lower cell. Imagine the kite looping around—the extra tail needs to go on the outside of that loop.

An important part of making a box kite as small as this one is selecting bamboo skewers that are as straight and consistent as possible. If you can do a perfect job, the kite might even fly straight with no tails at all, over a large wind range. On something this small, it's just hard to do.
Out in the Field
Box-kite stories of my real-life flying experiences are worth checking out!
They're illustrated with photos and videos, of course.
Isn't it great to not be grounded when it's fairly windy outside and it's way too strong for the light-wind MBK designs!
If you think you have done an accurate job of selecting skewers and constructing the kite, experiment with using less tail. It will fly higher with less tail to drag it down.
I hope you've enjoyed learning how to make a box kite!
As mentioned earlier, there's more kite making on this site than you can poke a stick at. :-)
Want to know the most convenient way of using it all?
The Big MBK E-book Bundle is a collection of downloads—printable PDF files which provide step-by-step instructions for many kites large and small.
That's every kite in every MBK series.
