- Home Page
- Better Kites
- ... Roller Kite
How to Build a Roller Kite
Step by Step—Page 1 of 3
The MBK 2-Skewer Roller
This set of instructions on how to build a roller kite assumes you know absolutely nothing about kite making. You might already have some
of the simple tools and materials required.
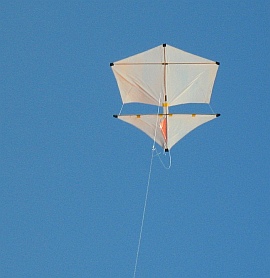 MBK 2-Skewer Roller
Anything you don't have is easily bought. If it's not exactly what I used, then at least something pretty similar!
The MBK 2-Skewer Roller kite is a medium-sized roller 58 cm (23 in.) across and 58 cm tall. That makes it somewhat smaller than the the original design that was flown in Europe many decades ago.
Some dihedral on the upper spar gives extra stability. Somewhat more dihedral on the lower spar plus a rear keel enable the roller to fly without a tail.
This 2-Skewer Roller is a reliable light-wind flier.
Take it out when it's not very windy, and you won't be disappointed.
On this site, there's more kite-making info than you can poke a stick at. :-)
Want to know the most convenient way of using it all?
The Big MBK E-book Bundle is a collection of downloads—printable PDF files which provide step-by-step instructions for many kites large and small.
That's every kite in every MBK series.
How to Build a Roller Kite
Frame
Have you read the page on kite materials? If you haven't already, do it now to see what's needed for building a roller kite.
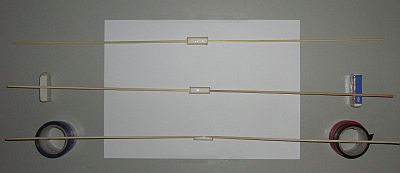
For this roller, you need to glue skewers together to form the three spars. Since this kite has plenty of sail area for its width, there is no need to worry about selecting the lightest skewers! In fact, stiffer and heavier skewers would be good for the vertical spar. As for any kite, it's best to try and match the left and right horizontal spars as well. Having said all that, just using any old skewers at random should not present any real problems. The wind range of the kite might not be as good as it could be; that's all.
- Snip the points off six skewers, then check to see that they are all exactly the same length; measure it; this is one skewer length.
- From another skewer, snip off five lengths of bamboo, each 0.1 SL (3 cm, 1 in.) long. These are the short reinforcers you can see in the photo.
- Arrange the three pairs of skewers as in the photo, with some paper underneath to catch excess glue.
- Prop up each end of the second pair of skewers to 0.1 SL (3 cm, 1 in.) above the table to give them dihedral.
- Prop up each end of the third pair of skewers to 0.2 SL (6 cm, 2 in.) above the table to give them even more dihedral.
- Get down to tabletop height, and look along the spars, and make sure they are as straight as possible.
- Lay down a thick line of glue all the way down each join as in the photo.
How to Build a Roller Kite
Sail
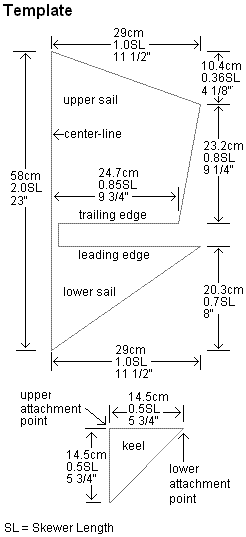
The template shown above represents one side of the kite sail. You will now transfer these measurements to the sail plastic.
Like to see a video clip? Just scroll down to near the end of this page.
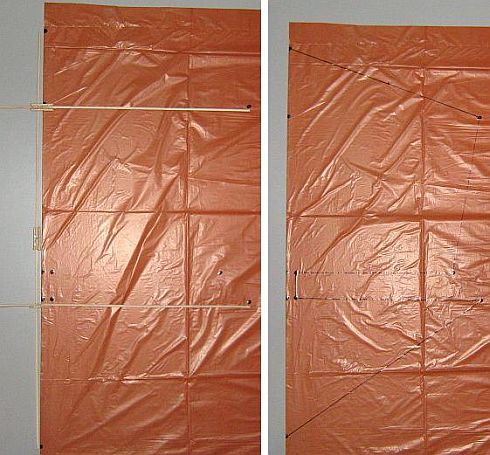
- First, take the large bag that you will be using for the sail, and lay it flat on the table.
- Make sure the spars are dry, then lay the vertical spar on the edge of the bag, and mark the position of the nose and tail of the kite.
- With a ruler, measure and mark all the other points as in the photo on the left. Do the sail "wingtips" last, laying down the horizontal spars to mark a dot at each spar end.
- Remove the spars, then use the marking pen to rule lines between the dots. See the photo on the right.
Note: Arranging the spars on the plastic by eye is quite accurate enough as long as you take some care. Since both sides of the sail will be identical, any small error in judging the 90-degree angle has almost no effect. I have made the dots big just so they show up easily in the photo.
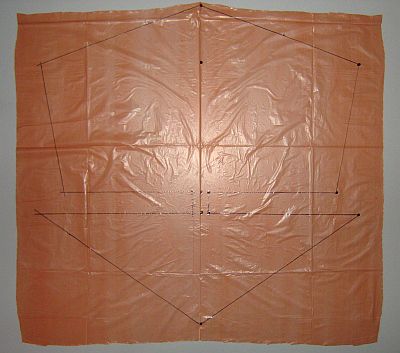
- Flip the plastic bag over, and trace over all the black lines using your marker pen and ruler.
- Cut out a rectangular section of the bag containing the kite sail, open it out, and lay it flat on the table. You can now see the complete sail outline as in the photo.
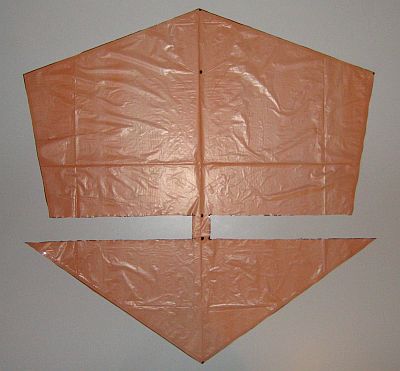
- Lay clear sticking tape along all the lines except the trailing edge of the upper sail and the leading edge of the lower sail. Each taped line should show through the center of the tape.
- With scissors, cut along all the black lines. This will leave half the width of the sticking tape inside the sail outline.
Note 1: I pull off the length of tape required, plus a bit extra on each end, then lay it down in one motion, pressing to the plastic at both ends at once. Then I smooth along the tape with a finger, making sure it is stuck down firmly along its entire length.
Note 2: Don't worry about overlapping lengths of tape at the corners; it will all look tidier after the cutting is done.
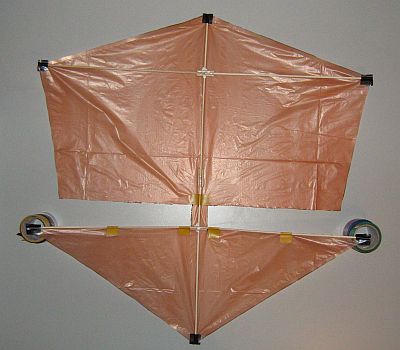
- Place the long vertical spar over the plastic, with the edge tape facing up.
- Cap the ends of the spar with electrical tape, as in the photo, by sticking it down over the bamboo and plastic then folding it under the plastic to stick on the other side. It's a bit tricky, so take your time!
- Next, lay down the two horizontal spars, and cap each end with electrical tape. Pull the slack out of the plastic, but don't pull it really tight.
- Finally, add extra pieces of tape. See the five pieces of yellow tape in the photo.
- Secure the upper horizontal spar to the vertical spar by running lines of glue above and below where the spars cross as in the photo.
- Secure the lower horizontal spar to the vertical spar with a drop of glue above and below where the spars cross as in the photo.
As mentioned earlier, there's more kite making on this site than you can poke a stick at. :-)
Want to know the most convenient way of using it all?
The Big MBK E-book Bundle is a collection of downloads—printable PDF files which provide step-by-step instructions for many kites large and small.
That's every kite in every MBK series.
