- Home Page
- Better Kites
- ... Dopero Kite
How to Build a Dopero Kite
Step by Step—Page 2 of 3
The MBK 2-Skewer Dopero
How to Build a Dopero Kite
Keels
Dacron line in 20- to 50-pound strength is suitable for all the Skewer Series kites.

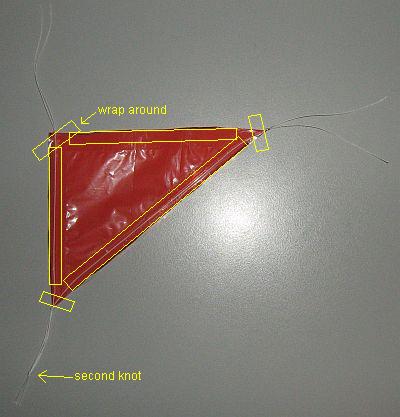
In this photo, pieces of clear sticking tape are indicated by yellow rectangles.
- Mark out a triangle on some spare sail plastic as per the dimensions on the template.
- Cut off four pieces of flying line, each about 1.25 SL (36 cm, 14 in.) long.
- Cut out the triangle, and tape down two lengths of flying line onto one side as visible in the photo.
- Now flip the plastic over, and tape down another two lengths of flying line directly over the first two.
- Also, lay down tape along the remaining edge of the keel on both sides of the plastic.
- Reinforce the keel corners by sticking down and wrapping extra bits of tape where the pieces of line come out, making sure the plastic remains flat.
- Where the four pieces of line come together, tie a Multi-Strand Simple knot as close to the plastic as possible, then tie another one further out as in the photo.
- Also tie Simple knots very close to the plastic at the other two corners.
- After all the knots are tied, trim off the line ends to an even length.
- You have one finished keel. Now do it all again to make the other one!
It's a bit fiddly, but you'll be proud of this kite when you finish it!
How to Build a Dopero Kite
Sail Tethering

At this point you need to make sure the glue is dry on the frame. If it is:
- Lay down the kite with the bamboo on top, and cut off two lengths of flying line of 0.6 SL (17 cm, 7 in.) each.
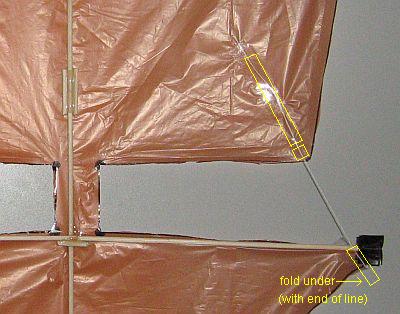
- First, tape the lines to the lower sail near the tips. Lay line over the bamboo, around the sail edge, and then back toward the bamboo on the underside—as shown by the yellow rectangles in the photo.
- Lay the lines across the upper sail, and tape them down with just a small square piece of tape near the sail corner.
- Carefully pull each line through the tape until there is no slack as in the photo.
- Add sticking tape to cover the full length of each line on the upper sail.
Note: During test flying in gusty thermal conditions, these lines had a tendency to pull out from the lower sail! Feel free to tie them to the lower horizontal spar instead, using two or three Half Hitches.
How to Build a Dopero Kite
Bridle

First, attach a keel to one side:
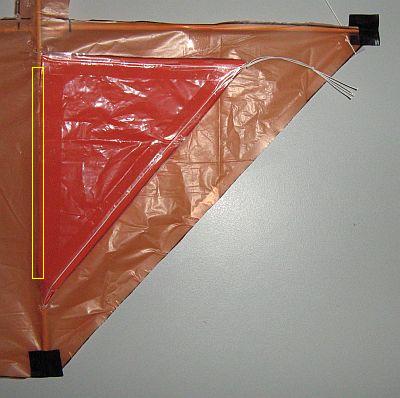
- Poke two holes in the lower sail (near the lower horizontal spar), where indicated by the black dots near the top of the photo.
- Take the keel, poke the upper two lines through the holes near the horizontal spar, pull tight against the knot, then tie them off around the bamboo using a Granny knot.
- Now poke the bottom two holes in the plastic, using the keel to find the exact spots for the holes.
- Thread the lines, pull tight against the knots, and tie them off tightly around the bamboo with a Granny knot.
- With the keel flat against the kite, lay clear sticking tape along its base, sticking it to the lower sail plastic. Flip the keel over, and do its other side too—see the yellow rectangle in the photo.
- All done? Now do the other keel on the other side!
These knots must never come loose, so use tiny drops of glue to keep them secure.

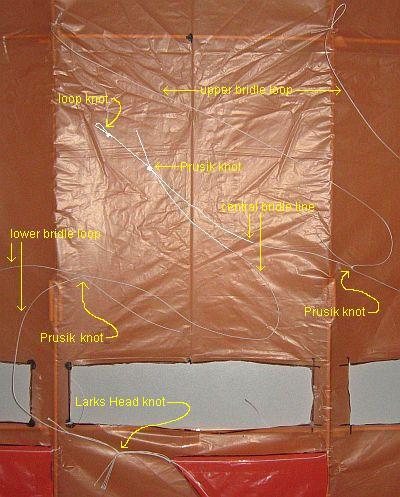
In the original photo, parts of the bridle were very hard to see, so I have colored them pure white.
Attach the upper bridle loop:
- Lay the kite down with the keel on top, then cut a length of flying line about 3.0 SL (87 cm, 35 in.) long.
- Tie a small Loop knot into each end of the line.
- Poke four holes in the upper sail where indicated by black dots in the photo.
- Attach each end to a vertical spar through the holes in the upper sail. Use a Double-Wrap Slip knot and pull tight, then secure with a tiny dob of glue.
Now attach the lower bridle loop:
- Cut off a length of flying line about 2.0 SL (58 cm, 23 in.) long.
- Tie a Loop knot into each end of the line. Don't make them too small, since...
- Attach each end to a keel using a Lark's Head knot, and pull tight against the keel's big knot.
Next, attach the central bridle line:
- Cut off some flying line about 2.0 SL (58 cm, 23 in.) long.
- Attach one end to the upper bridle loop with a shiftable knot, such as the Prusik.
- Attach the other end to the lower bridle loop, also with a shiftable knot.
- Shift each knot to the middle of its loop. Check by suspending the kite from the central line, then tighten both the knots. Don't worry, the knots are still shiftable.
Finally, take a length of flying line about 0.5 SL (15 cm, 6 in.) long, and tie one end to the central bridle line with another Prusik knot. Tie a small Double Loop knot into the other end.
At this point, you've pretty much finished making the 2-Skewer Dopero. Whew. But hey, I'm looking at it now, and it's the best skewer kite of the lot!
As mentioned earlier, there's more kite making on this site than you can poke a stick at. :-)
Want to know the most convenient way of using it all?
The Big MBK E-book Bundle is a collection of downloads—printable PDF files which provide step-by-step instructions for many kites large and small.
That's every kite in every MBK series.
